

No coding wanted. Simply load current code onto the ESP32-S3.
Adrian Kingsley-Hughes/ZDNET
Comply with ZDNET: Add us as a preferred source on Google.
ZDNET’s key takeaways
- An inexpensive $7 board can flip its hand to advert blocking.
- It really works as a DNS sinkhole, stripping out adverts earlier than obtain.
- Different choices embody utilizing a Raspberry Pi and shopping for {hardware}.
They are saying that necessity is the mom of invention, and the skyrocketing costs of Raspberry Pi boards have positively been the kick within the pants that I’ve wanted to take a look at cheaper, maybe additionally better-suited, alternate options. I imply, the Pi is a great boardhowever for lots of purposes I’ve used it for over the just about 15 years that they have been round, it is also been overkill.
The opposite day, I wanted to place collectively an ad-block resolution, not as a result of I dislike adverts, however just because I used to be working with fairly a restricted bandwidth. I reflexively reached for a Raspberry Pi board, however stopped after I remembered how a lot they value these days and put it again.
Additionally: I tested a Bluetooth tracker that leverages LoRa mesh networks to find things – and it’s so accurate
I used to be going to make use of PiHole on the Pi, however then I remembered coming throughout an ad-block project that labored on an ESP32 board. And the excellent news is which you can decide up a kind of boards for beneath $10.
ESP32-S3 (left) vs ESP32 (proper).
Adrian Kingsley-Hughes/ZDNET
Introducing the ESP32-S3
There’s an enormous distinction between a Raspberry Pi 5 and an ESP32 board (particularly the ESP32-S3 board). The Pi 5 is powered by a 2.4 GHz quad-core Arm Cortex-A76 64-bit chip, gigabytes of RAM, and the flexibility to make use of microSD or quick NVMe SSD storage, whereas the ESP32 makes use of a dual-core Tensilica Xtensa LX7 32-bit processor that may run at as much as 240 MHz, 520 KB of RAM, and as much as 16MB of flash storage.
Additionally: I built my own Wi-Fi router with a Raspberry Pi for Starlink and solar control – here’s how
A Pi 5 can use as a lot as 12 W of energy (and that is earlier than you hook up numerous HATs and such), whereas an ESP32 board makes use of milliwatts.
For this challenge, I am pleased to go together with the ESP32, however there are a number of compromises that I am going to must reside with — extra on these later.
What you want
First, you want an ESP32 board. Search for the ESP32-S3 with 8MB of PSRAM (there is a 4MB model too, however utilizing this board will lead to compromises) moderately than the traditional ESP32. The ESP32-S3 is quicker and extra environment friendly, and also you want this energy to run the ad-block software program. The most cost effective method to purchase these boards is in a 3-pack for $20.
Whenever you get an ESP32-S3 board for the primary time, it is regular to assume, “Wow, that is tiny, there have to be extra to it,” however there is not. It truly is a pc you possibly can stability on a finger.
Properly, you have to a USB-C cable to switch information and energy the board. Nonetheless, you do not even want a microSD card for the board to work.
Additionally: I installed a $17 solar panel onto my doorbell camera, and it’s easily my best smart home investment
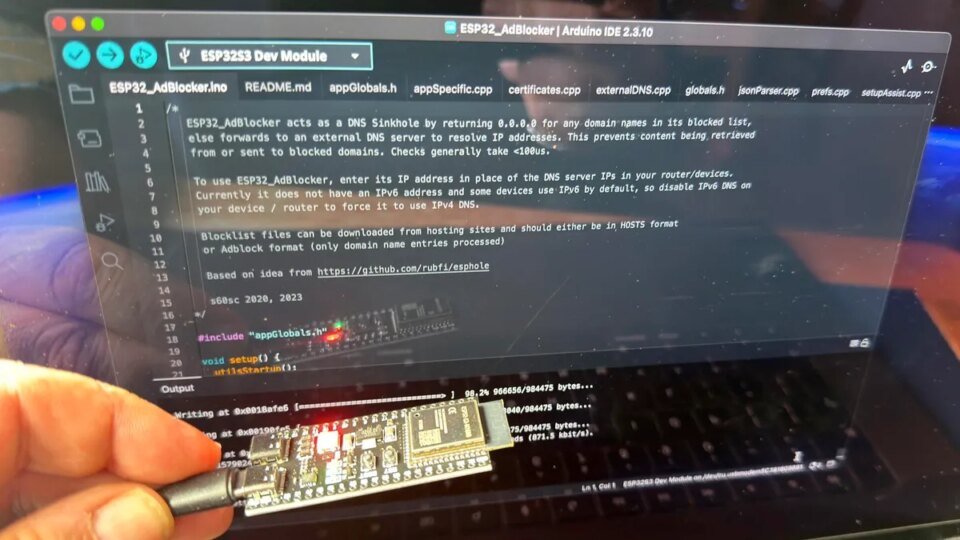
Speaking of the software program, you may additionally have to obtain ESP32_AdBlockerwhich does all of the onerous work. You may additionally want the Arduino IDE utility to put in the software program onto the board. Putting in the software program is simple — configure the Arduino IDE utility to work with the ESP32 boardopen the product within the utility, join the board to your PC, and click on add.
Observe that if you join the ESP32-S3 board to your laptop, it has two USB ports. You need the one marked as COM or USB/Native (trying down on the board with the ports on the backside, that is the port on the suitable). Alternatively, strive a distinct port.
For those who get into hassle, there’s no end of help available. One of many largest points I discover folks run into is making an attempt to attach the ESP32 to their laptop utilizing a charge-only USB-C cable. I additionally needed to fiddle with the compile and board settings within the Arduino IDE software program. I’ve added a screenshot beneath of the settings I used to get issues working.
And at last, when you want a case for the ESP32-S3 board, you’ve choices. You possibly can buy one, 3D print oneor do a MacGyver and wrap it in a little bit of electrical tape or large-diameter shrink-wrap tubing (about 1.5 inches throughout).
Establishing the board
OK, so you’ve got loaded the software program onto the ESP32. Now it is time for a primary boot and to get the board arrange. Your ESP32 board is now a community equipment.
On first boot, the ESP32 begins in Wi-Fi entry level mode with an tackle that begins: ESP32_Adblocker_XXXXXXXXXXXX (the place every X is an alphanumeric character).
As soon as you’ve got related to the Wi-Fi, go to 192.168.4.1 and add the Wi-Fi SSID and password to your router. After one other reboot, it is time to specify the URL of the blocklist you wish to use (you’ll find a large repository of blocklists here), and you then’re just about carried out with the board.
We’re in. ESP32_Adblocker efficiently put in.
Screenshot by Adrian Kingsley-Hughes/ZDNET
The one different factor to do is configure your units to ship DNS requests (extra on this in a second) to the ESP32 board. To do that, it’s essential take that earlier tackle — 192.168.4.1 — and use it because the DNS tackle. A great way to learn the way to do that job is to take a look at CloudFlare’s excellent documentation for the platforms (bear in mind to set the DNS to your ESP32’s tackle, not CloudFlare’s 1.1.1.1 tackle).
However how does it work?
Whenever you sort a URL or click on a hyperlink, your browser must know the place on the web that net web page lives. To search out this info, your browser consults a web-based listing known as a DNS server through DNS lookup (DNS stands for Area Naming System).
Consider DNS as a cellphone listing, however for server addresses. The net web page, and all of the parts of that net web page — the photographs, any movies or sounds or animated under-construction GIFs, and, after all, the adverts — can all be on the identical location or come from totally different servers scattered all all over the world. The browser appears up the addresses of the place all these components of the webpage are saved to construct the web page that it reveals you.
Now, this is the intelligent bit. Since you now informed your smartphone, PC, or router to ask the ESP32 board for DNS info (which is why you needed to change the router’s DNS setting for this strategy to work), each DNS lookup that occurs is filtered by that tiny ESP32 board first.
Additionally: My 7 essential laptop-bag items after decades of working remotely
The ESP32_AdBlocker software program holds a blocklist of thousands and thousands of addresses for web adverts, and, put merely, each time the browser requests one thing that is within the blocklist, the software program tells the browser that it may well’t be discovered by pointing it to the 0.0.0.0 DNS tackle, and the blocked advert by no means masses, saving you a little bit of web bandwidth. If the tackle isn’t on that record, the board passes that DNS lookup to a correct DNS server.
What you’ve got constructed is a DNS sinkhole for almost all of the adverts that you just see on the web.
There are limitations. For instance, the technique does not work with YouTube adverts as a result of they’re served from the identical server and on the identical tackle because the movies you wish to watch, so blocking these adverts would block the movies. The strategy additionally does not work with newer IPv6 web addresses.
However this challenge nonetheless reveals what’s achievable with a tiny board costing beneath $10.
The ESP32-S3 in motion, filtering adverts.
Adrian Kingsley-Hughes/ZDNET
Not the one possibility
For the appliance I wanted — a short lived resolution to work with a limited-bandwidth web connection — this strategy works. And it was a kind of attention-grabbing initiatives to play with. If I needed a long-term resolution, or I did not wish to put a velocity bump on a quick web pipe, a Raspberry Pi Zero 2 W working PiHole is an effective resolution.
Additionally: I tested a $15 smart switch and found a coffee maker wasting $1,500 a year in electricity
However that strategy already pushes the associated fee as much as not less than $15 for the naked board, plus a microSD card. Nothing that is going to demand a second mortgage, nevertheless it’s a distinct degree for certain.
You might run PiHome on a very separate laptop, or in a digital machine on a pc. Or buy an appliance that supports ad blocking out of the box. However what is the enjoyable in that? Completely different horses for various programs.